The Extra Paycheck Podcast was launched in early April of 2015. I was bombarded with questions on how to start a podcast. In May of the same year I published the The Ultimate Guide to Podcating.
I updated this post in April of 2020 with the most current resources and information.
This guide became one of the most visited articles on this blog. A lot has changed in the past 20 months (including my podcasting set up). Although the old set-up is very cheap and works fine, I ended up losing a few episodes because of it. I answered a bunch of emails and Reddit questions explaining why I changed my set-up and how it’s configured. Naturally I’ve decided to write a brand new guide and publish it here.
How to Start Your Own Podcast
For your convenience I created a table of contents. Simply click on the desired section to be taken directly to it, however I highly recommend reading through the full guide.
Part 1: Intro
Part 2: Podcast Equipment
Part 3: Connecting The Equipment
Part 4: Recording And Editing Your Podcast
Part 5: Exporting and Finalizing Your Podcast
Part 6: Uploading Your Podcast
Part 7: Distributing Your Podcast (iTunes, etc)
Part 8: Growing Your Podcast Audience
Besides changing my set-up I’ve learned quite a few things about podcasting over the past (almost) 2 years. This guide will be quite different from the original guide. However I will include every single detail that you need to know in order to launch your own show. I wasted a lot of time researching every single step of setting up a podcast so you don’t have to.
There are hundreds of different microphones and mixers. Also there are dozens of different ways to set up a podcast. The main goal of this post is to help you set everything up today and start podcasting. You can spend your time researching every little detail but wouldn’t you rather spend your time recording your episodes? The process and set-up I am about to describe works well for me and it should work just as well for you.
Let’s do this!
Before You Launch
Before actually spending money on launching your podcast you must give it some serious thought. What is the reason you are starting a podcast and what is the niche for your show. You might hear that “podcasting is huge and you must jump into it now”. Or that “podcasting is over-saturated, don’t even even try starting your own show”. Two very contradicting ideas.
In reality podcasting is gaining more traction. I can’t predict when it will become mainstream (if it ever will) but the numbers don’t lie. 12% of Americans (age 12+) have listened to a podcast on any given month in 2015. In 2016, that number grew to 21%: that’s 57 Million listeners! And this is only in the USA (source). Most of the podcasts are niche-specific, meaning that they cover a rather narrow subject.
This brings me to the first point: select your niche. You might want to start a casual podcast with 2 of your buddies. You will talk about history and Netflix and sports and beer and your girlfriends and everything in between. These kinds of podcasts seem to fail rather quickly. It’s almost impossible to grow an audience if your show is about “everything”. Let’s say you’re just doing it for a few friends then go ahead. But if you’re serious about your show then niche it down.
Podcasting for Money?
If your main goal for starting a podcast is to make money then you might be disappointed. Sponsors usually don’t even look at podcasts when an episode gets less than 5,000 downloads in a month. That’s a lot of downloads. The average advertising rate for podcasts starts at $10 for 1,000 downloads. Unless your show is getting 10,000+ downloads per episode this venue isn’t very interesting or profitable. You can advertise your own products within the podcast or affiliate products but that will probably not earn you very much. Most people are listening to podcasts to get the content. They will not stop everything, open their browser and type in whatever you’re promoting.
I am not saying that it’s impossible to earn an income with a podcast. It is however extremely difficult and it shouldn’t be your main goal. Podcasting is great for promoting your own brand though, although the impact is hard to measure.
Required Podcast Equipment
At this point you have selected a niche and you’re ready to start podcasting. You will need the proper equipment to get you going.
As I mentioned in my original “How to start a podcast” guide all you really need is a USB microphone and a computer. This kind of set up cost me about $100 and worked well until it didn’t. The sound quality was okay but the recording software would crash from time to time. My sound driver would act up. My Skype recording software would decide to stop recording sound after the 3rd minute of a very important interview. Things would happen all the time!
I’ve recorded a few amazing interviews for my podcast only to realize that nothing recorded or that the file was corrupt. When I’ve had enough I decided to spend a little more money. In this section I will be talking about my podcast equipment. You can spend thousands of dollars on equipment. My goal here is to help you get started for a very low price and as soon as possible.
Podcasting Microphone
Don’t even make the mistake of Googling “what’s the best podcasting microphone”. I made that mistake and ended up in a rabbit hole. There are lots of great microphones. There are thousands of people reviewing mics and that will confuse you even further. My first mic was a Blue Yeti which is a good USB mic. My new microphone is an Audio-Technica AT2005. I got a new mic because I needed an XLR capability so I could plug it into the mixer.
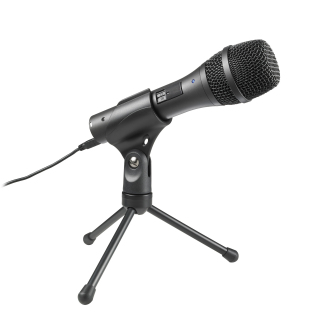
The AT2005 is a cardioid dynamic USB/XLR microphone. It has hundreds of positive reviews all over the internet. You can find it for $80 or less on Amazon and the sound quality is great, especially at such a low price point. You can spend hours or days researching microphones or you can simply get the AT2005. I’ve researched it a lot and I’ve been happily using it for the past 6+ months.
Podcast Mixer
This next piece of equipment was a huge step-up for me. Why do you need a mixer?
First of all, a mixer simply gives you more control. A mixer can accommodate several microphones at the same time. This feature is great when you have 2 or more hosts at the same location. You need a mixer if you want to use an XLR microphone connection instead of a USB. You can have your special effects and intros done directly on the mixer. This will save you a ton of time in editing. If your podcast’s guest volume is very low you can simply boost it on the mixer. Finally, you can record your episode on an SD card instead of using unreliable software.
The last point was a game changer for me. I was recording an amazing episode with a guest over Skype. Pamela for Skype was the software recording the conversation since Skype itself cannot record anything. On the very last minute of out conversation Pamela simply crashed. The whole episode was gone, forever. I can’t even express how embarrassed I was in front of my guest. Eventually I tried to invite that guest again so we could re-record the episode. She never replied and I understand that. A person running an $80 Million e-commerce business doesn’t have much time to waste.
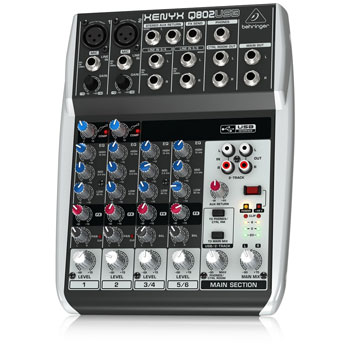
My choice was a very affordable Behringer Xenyx Q802 Mixer.
This mixer caught my attention because of its attractive price of $80 (and sometimes less). It has 2 XLR microphone ports for recording 2 co-hosts at the same time. The Xenyx has all the basics you will need for recording a podcast. Lots of positive reviews online are proof that this is a great beginner mixer.
If you have more than 2 co-hosts recording the podcast locally then look for a mixer that has 4+ XLR ports. Behringer has a lot of different mixers and the prices are relatively low.
Podcasting Recorder
You know how earlier I explained how I lost whole episodes because of software issues? That is the main reason I upgraded my full podcasting set-up. An important ingredient in my new set-up is a digital recorder. A portable recorder plugs into your mixer through an audio cable and records everything coming out of it. This piece of hardware hasn’t failed me a single time. It records everything on an SD card which are very reliable these days. I also use the portable recorder when I make videos (without using my AT2005 microphone). The camera audio is not great and the recorder takes care of that issue.
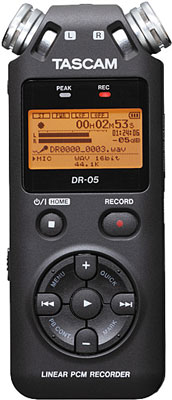
Once again I spent a lot of time reading specs and reviews. I purchased the TASCAM DR-05 Digital Recorder and I am loving it. The sound quality is great and there are plenty of options and features. The DR-05 works on 2 AA batteries and the recorder shows the charge. When I get to 1 bar (out of 3) I make sure to put in new batteries before recording.
This recorder can be purchased for $100 or less which is an awesome price/quality ratio. A 2gb SD card is included.
Many podcasters often debate between the DR-05 and the Zoom H1 (same price category). I can’t vouch for the H1 since I haven’t tried it but it seems to be a great recorder as well. Flip a coin, and take your pick!
Microphone Suspension Boom Scissor Arm Stand
This piece of equipment is optional. If you buy the AT2005 it will come with a little desk stand. I prefer to have the ability to sit comfortably and sometimes to even stand up when recording a podcast. The microphone arm allows me to do just that. It is currently attached to my desk which isn’t ideal since it picks up some noise when I type or hit the table. I am planning on attaching it outside of my table.
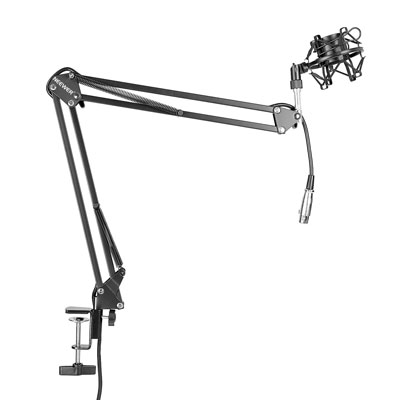
Just like microphones, recorders and mixers these arm stands come in a variety of options. I went with the Neewer Microphone scissor arm stand. This arm is very flexible and it costs about $20-$30. It also comes with an XLR cable running through it which makes the set up super fast and easy.
Microphone Pop Filter
When I bought my first microphone I totally neglected the pop filter. When I listened to my first recording I realized that the microphone amplifies the “S” sounds and a few other things. This is when I ended up purchasing a pop filter. This simple little thing improves the sound by a lot. The best part? It costs only $6. There are more expensive variations but the one I got works great.
Cables
After I received everything for my new podcast set-up I realized I was missing a few cables. The microphone came with an XLR and USB cables. The mixer came with a power cable. The arm stand came with its own XLR cable as well. However I had no way of connecting the mixer to the recorder and the computer. At this point I left everything on my desk for a month or so. I knew it would take me a while to figure out which cables I needed and procrastination took over.
Eventually I decided I was ready to finalize the set up, here are the cables I needed to order:
- 3.5 mm TRS to 1/4 inch TRS Stereo cable. Sometimes referred to as 1/8 to 1/4 cable. This cable connects into FX SEND on the mixer and the Microphone jack in the computer. This cable is used so your remote guest (ex: Skype) can hear everything coming out of your mixer.
- 3.5 mm TRS to Dual 1/4 inch cable. This cable connects into the Line-In on your mixer and the headphone jack on your computer. It is used so your mixer can hear your remote guest.
- 3.5 mm TRS to Dual RCA Stereo cable. This cable is used to record everything that comes out from your mixer into your digital recorder. It plugs into your mic port on the digital recorder and and 2Track Out on your mixer.
- Optional: this is a second 3.5 mm TRS to Dual 1/4 inch cable. If you’re using your phone/iPad/iPod to play special effects or intros/outros on your show then you will need this cable. The 3.5 mm plugs into your device and the dual 1/4 inch cables plug into another Line-in on your mixer.
At the moment of writing this each cable costs less than $10. The total for the whole set-up is just under $300. I told you you can start your own show without braking the bank 😉
Headphones
Last but not least. Your guest hears you. The mixer hears you, your guest and your special effects. Your digital recorder hears everything and everyone so it can record it all. The only problem is that you don’t really hear anything. This is why you need headphones. Your headphones simply plug into the Line Out port on your digital recorder. This is how you will be monitoring everything.
I am currently loving the Sennheiser Momentum On-Ear Headphones which I picked up for under $100. You can use any headphones you like. Just make sure they are comfortable. My back up pair is Audio-Technica ATH m50X. These headphones are amazing, although a bit bigger, I used them for podcasting as well as DJing.
You might be feeling overwhelmed right about now. Don’t worry, I’ll show you how it all plugs in together.
Get Your Set-up Ready For Recording A Podcast
Local host(s)
You’re in luck if you are recording locally, alone or with a co-host. Simply plug the microphone’s in their XLR ports on the mixer and turn the Level knobs to a desired level. You may want to experiment with GAIN knobs, mine is almost all the way down.
Use the 3.5 mm TRS to 1/4 inch TRS Stereo cable to plug your FX Send port to your digital recorder. That’s it. Optionally you can plug your iPod into channel 3/4 or channel 5/6 using the 3.5 mm TRS to Dual 1/4 inch cable. You only need this if you want to add your special effects or extra sounds while recording the podcast. Hit the “record” button on your recorder twice and you’re live!
Remote guest
The set up gets a little more complex if you’re trying to record an interview with someone over Skype or other software. I will explain everything and even include some photos of my own set-up to make it easier for you.
Tip: If possible it’s always a great idea to have your guest record their own voice locally then send you the file. Although Skype (and other programs) works great in general there might be some internet issues that will mess up the sound. However most of my guests aren’t able to record locally since they have no idea how to do it.
There might be a different way of connecting things. I’ve spent several hours leaning about mix minus and other terms. I watched dozens of videos on how to connect everything. This particular set-up works for me and this is why I am recommending it.
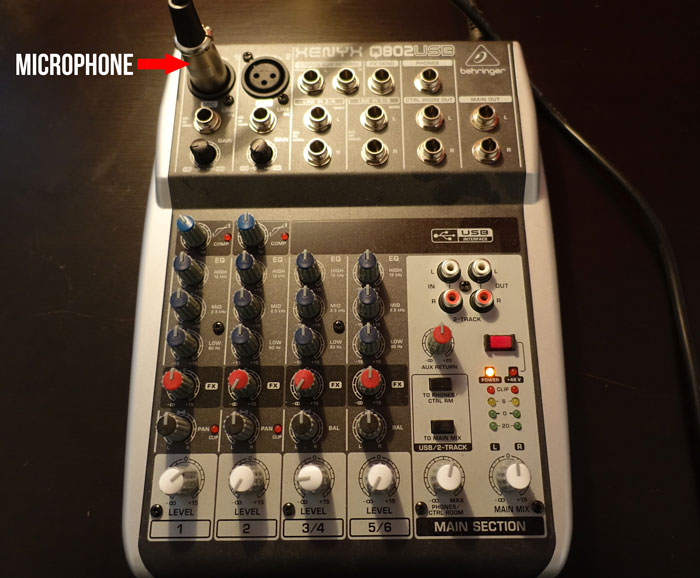
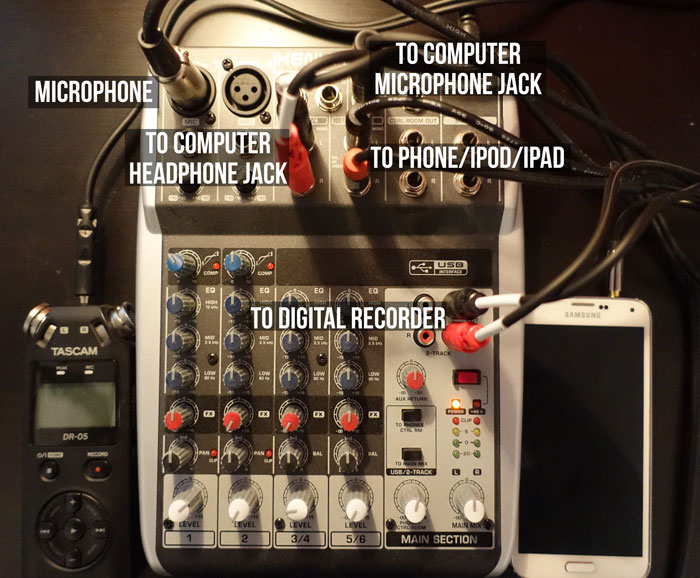
1. Connect your microphone to the MIC 1 with the XLR cable. You can use the cable that came with your microphone or the one that came with your scissor arm. I opted for the latter. I leave most of the knobs in the “zero” position. The black gain knob for the microphone is turned almost all the way down to the left. The while LEVEL 1 know is turned slightly to the right. You will adjust it later for your mic volume.
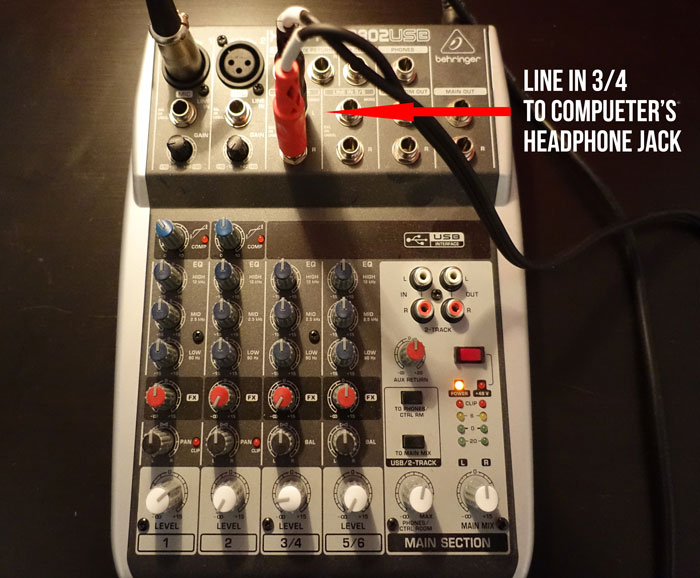
2. The 3.5 mm TRS to Dual 1/4 inch cable is plugged into Line In 3/4 on the mixer and the headphone jack on my computer. This is for the mixer to hear my guest on Skype. The red FX knob is turned all the way down to avoid feedback. The while Level 3/4 knob is turned mid way to the left (middle between “0” and “∞”) but you might need to adjust it, this is the volume of your guest.
3. The 3.5 mm TRS to 1/4 inch TRS Stereo cables plugged into the FX send on the mixer and the microphone jack in the computer. This is done in order for the guest to hear me and the mixer (in case I am using special effects).
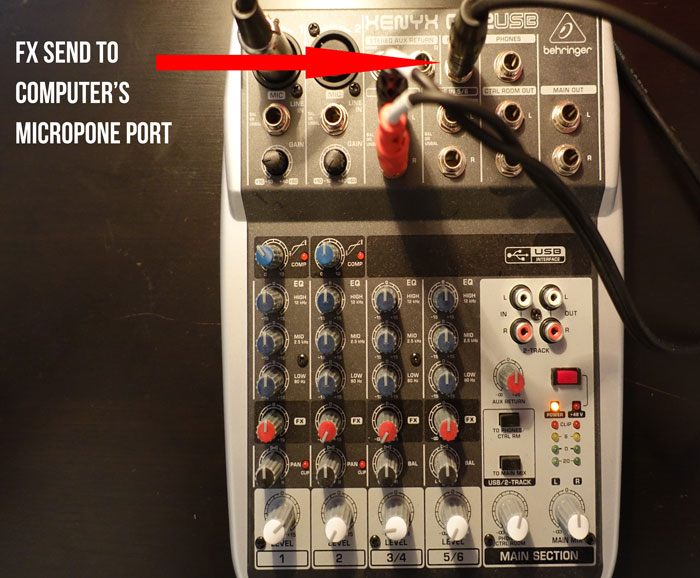
4. The 3.5 mm TRS to Dual RCA Stereo cable is plugged into 2 Track OUT on the mixer and into the Mic/Ext In on the digital recorder. This is done for the recorder to be able to hear everything that’s coming out from the mixer.
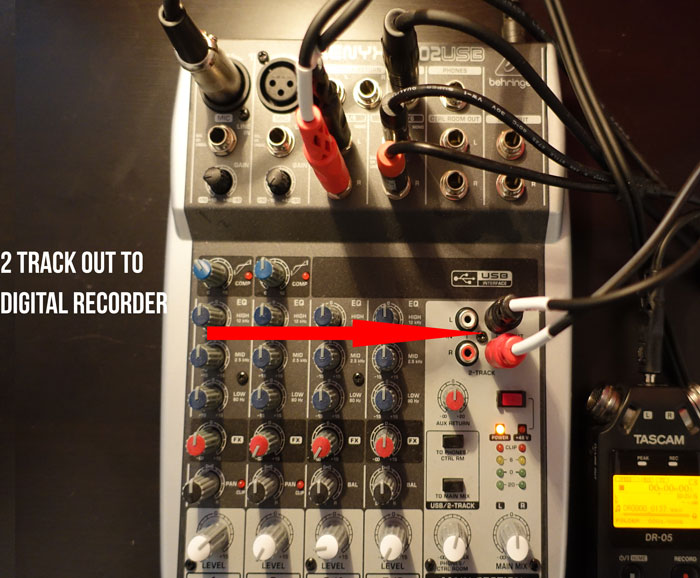
5. Optional. The 3.5 mm TRS to Dual 1/4 inch cable is plugged into Line In 5/6 on the mixer and headphone jack on my phone/ipod. This is used for live production. I play the intro at the beginning of the show and an outro at the end of the show. I will expand on that a little later.
Tip #1 If you are using a MacBook you might not have a headphone and a microphone port on your computer. If this is the case you’ll need to purchase a Rockit splitter.
Tip # 2: Don’t touch the knobs and leave all of them in the “0” position. Turn the red FX knob for Line In 3/4 all the way down. Do play with white Level knobs in order to adjust the volume for your microphone, your guest and your special effects on Line In 5/6.
Recording Your Podcast
Once everything is plugged in you should make a test recording. I suggest calling a friend on Skype and asking them to spend a few minutes online so you could adjust the volume levels and make sure everything works fine.
Before making a call plug your headphones into Line Out on your digital recorder (on the left side if you’re using the DR-05). Turn the recorder on and press on the record button once. If you don’t press it you won’t be able to hear anything. The red REC light on your recorder will start flashing. You can now make a Skype call and you will be able to hear everything. In order to actually make a recording you’ll need to press the record button a second time, the REC light will become solid red. You are now recording your Skype conversation onto the SD card in your recorder. Once you are done recording hit the stop (HOME) button. You can now play the recording directly in the recorder by pressing the Play button. You can also transfer the file on your computer and make sure it sounds good.
The only problem you can have now is Skype crashing (never happened to me). Before recording an episode I always restart my computer and router just to be sure everything is up and running smoothly.
Once your podcast is recorded you can either transfer the file to your computer by plugging your recorder with a USB cable or by inserting your SD card into the computer.
Tip: never delete any files using your recorder. Transfer every single file to your computer first. I’ve made a mistake of deleting a full episode recording from the DR-05 because I thought it was a different file. Good thing there are deleted file recovery tools.
Editing Your Podcast
I edit pretty much every single episode before releasing it. In this section I will take you through my process of editing a podcast.
First of all you will need an audio editing software. I highly recommend Audacity as I’ve been using it for the past (almost) 2 years. It’s simple, it does everything I need it to do and it’s completely free. Audacity is compatible with Windows, Mac and Linux. If you have a Mac you might try GarageBand which should be pre-installed on your computer.
I’ve made a few changes to my editing flow since I started. I used to record the interview first. Then I would record myself saying the episode number and the introduction of the episode. I would also record the outro/call to action. Once I had all the recordings I would piece it all together in Audacity. Episode number, intro music with voice over, podcast intro, main interview, outro music and finally the call to action. This would mean 6 different tracks.
Now I do all of this live while I am recording the episode (for most episodes). Do you remember how I mentioned that I plug my phone into Line 5/6 on my mixer? This saves me so much time!
When I get my guest online I have a pre-recording chat with them and when we’re ready to start I start recording. I say the episode number then I cue the intro music on my phone. As I am presenting my guest I slowly reduce the volume of the music on my phone and we go into the actual interview. When the interview is on its last seconds I cue the outro music and do my call to action. Boom! I have one single file with all 6 pieces already in it.
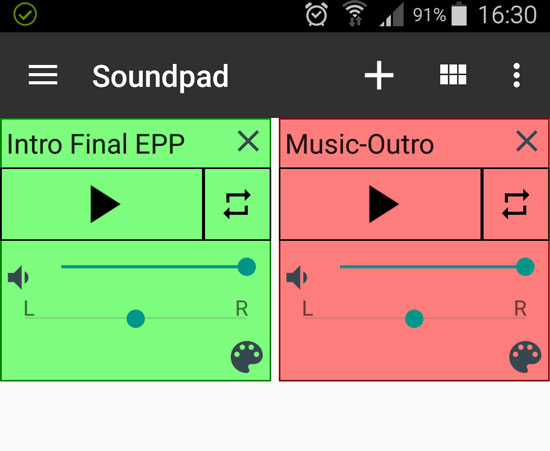
Tip: I use a free app called Soundpad (Android only) in order to play my intro and outro during the episode recording. Many similar apps are available for Android and Apple devices. AudioBoard (formerly SoundSlate) seems to be a highly recommended app for iOS users but I have not tried it and wasn’t able to find a free alternative. If you have a similar free app to recommend, please let me know.
I don’t remember where exactly I got the music for my intro/outro but it was free (and the music is copyright free).
The “explosion sound effect” in the intro is from AudioJungle. I didn’t need it but I wanted to start my episode with a “boom” and that cost me $1. Then I hired a voice over professional on Fiverr.com. That was another $5 well spent. In total my intro and outro cost me $6. I edited the intro together in Audacity and saved it as a separate MP3 file which I now use for every episode.
Here is an example where you can hear my intro, music and everything else:
What I Still Edit In My Podcast Episodes
Before releasing an episode I always make sure to listen to it attentively at least once. I used to do a LOT of “Ums” and “Ahs” during an episode but with time I’ve been able to reduce that number greatly. However sometimes I still might exaggerate on these. Sometimes there might be a weird sound coming from my side or the guest’s side and I try to edit those out if possible.
Personally I don’t have anything against profanities but I do edit them out. My podcast is rated “Clean” on iTunes and I do realize that some people listen to the show in a family setting where kids might be present. Most of my guests don’t drop any F-bombs so it’s very rare that I actually have to edit anything out.
When I first started the podcast I thought I would also cut out all the mistakes, off-topic chats and laughs. However I have changed my mind and I love those little moment. I find they give more authenticity to the podcast and many listeners told me they appreciate such moments. We’re just two regular people chatting. You wouldn’t cut moments from a real life conversation would you?
In short, editing the actual file used to take me 5+ hours when I just started and now it takes me 1-2 hours at most.
Exporting Your Podcast Episode
Once the episode is edited to your liking you can export it. Here is a little technical knowledge for you. .WAV files have a lot more editing possibilities than MP3 files. When I export the episode for the very first time I select the WAV format.
In Audacity simply go to File -> Export Audio and pick WAV in Save as type. Click on Save.

This will create your audio file. However WAV files are huge and you don’t want to upload that file to your podcast hosting (more on hosting later). We export the file in .WAV because we want to edit it one last time. Your podcast volume levels will be different for your side of the recording, your guest’s as well as your intros and outros. We want to make sure that the volume is on the same level throughout the whole episode.
There are 2 main ways to do that. I use a free tool called Levelator. Unfortunately this tool is no longer updated but you can still download it from the official website. Simply drag and drop your WAV file into Levelator and it will automatically start processing the file. This process might take a few minutes depending on how long your episode is. Once finished, it will create a new audio file called filename.output.wav. The file will be saved in the same folder where the original file is.
At this point you import the output file back into Audacity. Then export is as MP3 this time.
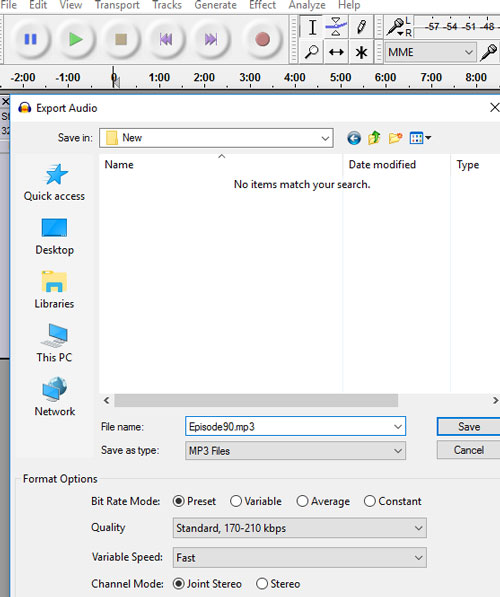
You can give it a quick listen and compare it to the original file, I am sure you’ll notice the difference.
Another option is auphonic. It’s an online service that does something similar to Levelator. I haven’t tried it but a lot of podcasters swear by it. You can process up to 2 hours of audio for free (in a month), after that you’ll need to pay.
Finalizing Your Podcast File
Although we’ve exported our MP3 file and made sure the volume level is good we still need to do a few more things to that file. I know that we’ve been spending a lot of time on that audio file alone but this last step is crucial.
We will need to properly ID3 Tag our file and add artwork to it. One thing at a time. Let’s start with Artwork. Artwork is basically an image that will show up for your show when people are listening to your podcast. This image will be shown on iTunes, Stitcher, TuneIn and other platforms. It will also be shown on iPods, smart phones and other devices for people who stream it or even download your episode. Artwork is a requirement for iTunes and other platforms so yes, you must have it.
Here is how my artwork looks right now:

Here are the requirements that iTunes imposes on podcast artwork:
Minimum size of 1400 x 1400 pixels and a maximum size of 3000 x 3000 pixels, 72 dpi, in JPEG or PNG format with appropriate file extensions (.jpg, .png),
The image has to be square and at least 1400 x 1400 pixels and the file size no more than 500kb. It needs to be in .jpg or .png format, that’s it. I would recommend resizing your image to 150×150 just to make sure that your show name is still clearly legible. Remember that iPods and smart phones will serve a much smaller version of your Artwork.
I had a picture taken of me (by my sister actually) for this artwork. Then I simply added the text in Photoshop. If you need inspiration go to iTunes and scroll through hundreds of podcasts in your category, this will give you some ideas what other popular podcasts are doing.
ID3 Tagging Your Podcast Episode
Tagging the episode means defining its name, artist name, and adding the artwork to it. Have you ever noticed how a downloaded song played on your phone or car stereo shows you this kind of information? This info doesn’t come from the filename.mp3 but rather from ID3 Tags.
I spent several hours trying to figure out how to do this while the answer was right in front of me. Most ID3 Tagging tools that you’ll find online either cost money or have limitations. There is however one software that does this with ease, is completely free and you probably already have it installed: iTunes.
I don’t really like iTunes and never use it as a music player but I had it installed on my PC because I have an iPod and I used to have a few iPhones. From time to time I also use iTunes to listen to podcasts although I normally listen to them on the podcast website directly. If you don’t have iTunes installed on your computer do it right now.
Create a simple text document on your computer and call it Podcast Info or something like that. Once you come up with your show name and artist name you can simply copy/paste it from that document instead of re-typing it for every single episode. For the “Artist Name” you can simply use your name: John Doe. For your podcast name (album title) : Fruit Diet Podcast. However I suggest taking it a step further. iTunes is a search engine just like Google. You need to use keywords to help that search engine (and the potential listeners) find you. Don’t throw in as many keywords as you can think of but do elaborate a little.
Here is an example of how it should be done:
Artist: John Doe: Diet Specialist, Nutritionist and Private Trainer
Podcast: The Fruit Diet Podcast: Healthy Dieting | Nutrition | Better Living
Once again, look at the top podcasts in your category and you’ll find that most of them are doing exactly that. If it works for them it will work for you.
Now that I have a document with my Name and Podcast name I created a Podcast playlist in iTunes. Drag and drop your MP3 file in that playlist. Right click on the file, click on Get Info. A new window will open and this is where you get to tag your file.
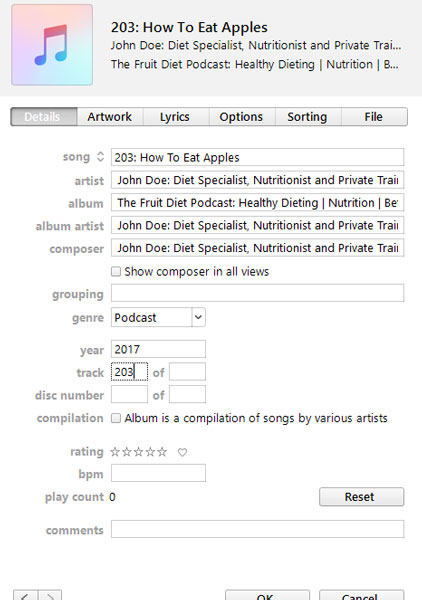
- Song – type in the title of your actual episode
- Artist – type in your name
- Album – type in the name of your podcast
- Album Artist – your name again (I don’t know if it’s needed but I do it anyway)
- Composer – your name once again
- Genre – select Podcast (if it’s not in the list simply type it in)
- Year – write in current year
- Track – number of the current episode
- Don’t click OK just yet.
- Move on to Artwork tab on top of that window
- Add your artwork
- Click on Options tab
- Select Podcast once again (default is music)
- Click OK!
Finally you have your episode ready to go. Congratulations, you’ve come a long way. I know this seems like a long process and it will feel like that for the first 10-20 episodes. Eventually you’ll be able to do this with your eyes closed (or almost).
Uploading Your Podcast
How to upload your podcast to iTunes? I see this question on Reddit, Quora and pretty much all over the internet all the time. The truth is that a podcast cannot be uploaded to iTunes. iTunes simply serves your show’s RSS feed once your episodes are hosted online.
When I was doing my podcast research in 2015 and I read about creating RSS feeds I was ready to give up. Eventually I managed to create a custom RSS feed through quite a bit of pain and hustle. With time I realized that there was an easier solution to it all. I will be explaining this simpler set-up to you. Don’t get frustrated, we’re almost there.
First of all you’ll need podcast hosting. There are free and paid options. After doing my research I realized that free options are rather horrible and useless. They put audio ads within your show and they fully control your show. This means they could shut it down for whatever reason or put so many ads that your listeners will never give you another chance.
There are freemium options where you can upload a certain amount of audio for free but will need to pay for more.
The last option is proper, dedicated podcast hosting. Before we get into this, no you cannot host your show on your website hosting. Hosting your podcast on the same shared hosting plan as your blog might seem like the logical thing to do but unfortunately it isn’t. Most (if not all) web hosting plans aren’t optimized to host media files such as audio and video. I know that your hosting plan is “unlimited” but it really isn’t.
Web hosts promise you “unlimited storage” and “unlimited bandwidth” because they know that most of their clients will never get a huge number of visitors. Once your website starts gaining popularity you might notice that your website is slowing down. This is because several simultaneous visitors are exhausting your server’s resources. If you have an audio or video file hosted there and all of a sudden 500 people try to access it at the same time your website will most likely go down.
If you’re unlucky to be with HostGator or a similar host, your website will be unreachable for a few hours or even days. This will also grant you a warning. If this happens again they will simply suspend your account. Don’t ask me how I know this.
Best Podcast Hosting
After hours of research and hundreds of reviews I narrowed my choice down to 2 podcast hosting companies: Libsyn and Blubrry. They are both very respected podcasting hosts and they have similar pricing models, Libsyn being slightly cheaper.
I went with Libsyn. They have been in business since 2004 and they host over 30,000 shows. Most of the biggest shows are also hosted on Libsyn. Bill Burr’s Monday Morning podcast, Mark Maron’s WTF Podcast, Pat Flynn’s Smart Passive Income podcast, Joe Rogan Experience, NPR and many others chose Libsyn. If it’s good enough for then then it’s good enough for me.
Podcast hosts limit your storage. However they guarantee unlimited bandwidth which is a must for your show. If tomorrow morning your podcast becomes the world’s most popular show and millions of people will try to download your episodes, Libsyn will be able to easily handle that. Their plans start at $5 per month but I am on a $15 plan. For 15 bucks I get 250Mb of storage per month. This means that all of my episodes uploaded in the previous month are still available and working just fine but they do not count in the new month.
Remember how I told you that your podcast files must be in MP3 format? This is the reason. Since podcast hosting platforms impose a limit on how much you can upload you must make sure your files are small in size while the quality is decent. .WAV files are simply huge (30 minutes = 300Mb+) and 1 single episode will take you over the storage limit.
A typical calculation for your MP3 file is 1 Minute – 1Mb. My solo episodes are usually 20Mb and my interview episodes are 30-50Mb. Since I upload 4 episodes per month I typically use 120-200Mb per month.
Note: I am now an affiliate for Libsyn and I was able to get a special discount. Use discount code “ALEX” at checkout and you will get your first month of Libsyn completely free! This means that you will actually get the rest of this month at no charge as well as the next FULL month of free podcast hosting. This offer is not available on Libsyn’s website. No need to click on any affiliate links, just enter ALEX at checkout.
If you do go with Libsyn then the set-up is rather straightforward. You sign up, create your show (add name, artwork, etc) and you’re all set.
December 2017 Update! Libsyn secured a partnership with Spotify which means that if your show is on Libsyn it will be available to 140+ Million Spotify users. Spotify does not accept podcasts that are hosted on other platforms.
Creating Podcast RSS Feed
Once your show is hosted you will need an RSS Feed. This feed will be submitted to iTunes, TuneIn, Stitcher, GooglePlay and other aggregators.
When I initially launched the Extra Paycheck Podcast I decided to create my own feed. Podcast hosts like Libsyn offer to create the feed for you but I thought I would go a different route. I’ve read that it’s better to create your own feed since it’ll give you more control.
In order to create that feed I needed to have a WordPress blog (which I already did). I had to install a PowerPress plugin. Create a custom podcast channel for that plug in. Spend hours trying to understand all the settings. Finally in order to add a podcast to the feed I had to create a new post on the blog, add the episode in that post and publish it. That process was exhausting but I though it was the best way to go about it. The main idea was that if Libsyn decided to shut down (or if I decided to change podcast hosting) I would lose my RSS feed if they controlled it. Logic, right?
As my number of episodes and listeners grew the feed started getting heavier and heavier. Sometimes it wouldn’t update. Sometime it would simply not work. This is when I started freaking out because I had no idea what could possibly be wrong. Was it the latest WordPress update that broke it? Or was it the plugin that was acting up? Maybe it was Libsyn? Was it something else? Knowing that iTunes removes shows from their directory if the feed is unavailable for too long I really started freaking out.
Back to the drawing board.
I talked to Rob at Libsyn and he explained that these complex setups do have a tendency of acting up. The biggest podcasts that I mentioned earlier do not have their own feed, they use Libsyn’s feed. If it’s good enough for them, it’s good enough for me. However I still had that fear that if I decide to leave Libsyn they’ll simply close my feed. Rob assured me that this isn’t the case. If I do move my show somewhere else they create a permanent redirect and everything works just fine without interruptions.
I moved my feed to Libsyn and haven’t had any issues since. At this point when I record a new episode I upload it to Libsyn and within seconds it’s available on iTunes and everywhere else. No more headaches, no more complicated set-ups, no more issues. And I know that if I ever run into an issue with my RSS feed – it’ll be on Libsyn. Eliminating all of the ingredients that could potentially cause damage feels great.
When you’re setting up your show on Libsyn you’ll need to enter a description for your show. I recommend writing at least a hundred words, more if possible. This is where you will also upload your Artwork (same that you used for your episode). The information that you enter in your show settings will be shown on iTunes and other places so make sure it’s awesome.
Final Thoughts on Podcast RSS Feed
When you create your show page on Libsyn they will ask you if you want to use their feed. Say yes and it’ll all be set up for you. Don’t over-complicate things and make the same mistake that I made.
Submit Your Podcast to iTunes
Finally we’re getting there! Did you know that In 2013 Apple has surpassed 1 billion subscriptions for podcasts via iTunes? This number is much higher in 2017, unfortunately I cannot find the exact stats. iTunes is the biggest podcast platform at the moment and this is why you must be on it.
To submit your podcast to iTunes you can click the Submit Podcast link directly on iTunes. You can also head over to Apple’s Podcast Connect – in both cases you would need an Apple ID.

This will take you through a fairly simple and quick submission process.
First you’ll need to enter your RSS Feed. It should look like this: http://yourpodcastname.libsyn.com/rss.
Once iTunes validates your feed they will offer a preview of how your show page will look on iTunes. Look through it and make sure everything is okay and you like it. If you want to edit anything simply go to your show settings on Libsyn and change it there. Remember iTunes doesn’t allow you to change anything inside iTunes since it’s simply displaying the information from your RSS feed.
Click on submit and you are done! Within 3 to 5 days your show will be live on iTunes! Sometimes the review process takes less than a day but be ready to wait. If you have followed through with this guide then you’re awesome! Congrats on having your own podcast!
Growing Your Podcast
Alright, I know that you’re tired by now and also excited because your show is ready to be heard by millions of listeners. Unfortunately just like with anything else you will need to promote and market your podcast. I would love to offer you a few growth hacks that have a huge potential. I wish I knew this information before I launched my show.
There is this thing on iTunes called New and Noteworthy. This is a highlighted list of new shows that iTunes recommends to listeners. I was lucky enough to get into New and Noteworthy and this gave me a huge initial push. I was featured to all these people who have never heard of me before. The total time you can be featured in the New and Noteworthy is 8 weeks so you must make sure you make the most out of it.
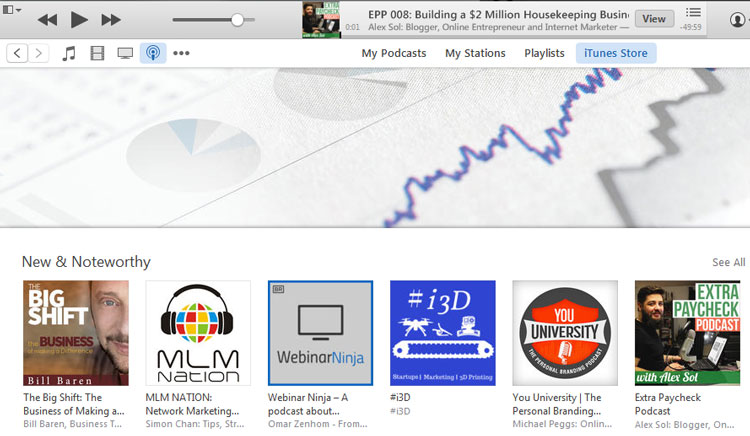
iTunes looks at a few metrics in order to decide if they should feature the show or not. First of all your show must have a clear and high quality Artwork. Your show must have a good description. We already took care of those two.
Getting Listeners on iTunes
At this point iTunes looks at how many downloads (listens) your show gets. There is a little trick to that. Let’s say you released your first episode and told all your friends about it. All 8 of your friends (including your grandma) went to iTunes and listened to your first episode. iTunes saw it and thought: “not bad, a brand new show and it got 8 downloads right away”. However, imagine if you had 10 episodes already released and all of your 8 friends download your 10 episodes? This means 80 downloads. Now we’re talking! iTunes counts the number of downloads and not the number of people who downloaded. The longer a listener stay within the platform the better it is for iTunes.
If you do launch your podcast with 10 episodes (I would aim for at least 5) the effect will snow ball. You get into New & Noteworthy and more and more people see your show. Some will download just 1 episode but many will love your show and download all 10 episodes. The more they download, the higher you rank. the higher you rank, the more downloads you get. Do you realize the power of this circle?
Getting Reviews and Subscribers
The second statistic that iTunes will look at while ranking your show is the number of reviews, ratings and subscribers that you’re getting within iTunes. My first advice would be asking every single friend and family member to subscribe, rate and review. Seriously, send a private message to everyone who could help you out. It’s incredibly hard to get new reviews especially for a brand new show and this will help you.
I end every single episode of my podcast with a call to action. I ask my listeners to subscribe, rate and review. It barely works but it certainly helps me. If people really like your show they’ll subscribe and listen to every single episode but chances are they won’t rate it or review it unless you ask them to do it. Most of your listeners don’t even know they can write a review for your show.
Once your show is approved by iTunes make sure to announce it everywhere you can. Send a note to your email list, post it on your blog, post it on all of your social media accounts. Once again call your grandma and tell her to show it to all of her friends. You know she’s proud of you.
Last but not least, release your episode consistently.Your listeners will love you for it. Make a schedule and stick with it. My listeners know that I will release a new episode every single Monday so they’re expecting it. You will not be able to grow an audience If you release 3 episodes this week, then none for a month, then 1 in the next month then 5 the month after that. Be consistent and let your listeners know when they should be expecting your new episodes.
I tried to think of every single detail when writing this guide however there is a chance I missed some small details. If you feel like something is unclear or if you have any questions regarding podcasting, please fo use the comment form below and I will get back to you as soon as possible.
Also I would love to hear your podcast once it’s launched so don’t be afraid to let me know about it.
Happy Podcasting,
Alex
Disclaimer: Some of the links in this post might be affiliate links. This means that at no extra cost to you I will receive a small commission if you purchase anything through my links. You can simply Google search any of the products mentioned and purchase the items without using my affiliate links. Please note that I only recommend products and services that I personally use and love using.

Hi,
Thanks so much for capturing all this information. I know you updated it in 2020 – would all this still hold true for now? July 2022?
Is there a way for the host and the guest to have headphones on to listen to the total output from the recorder? I want the guest and myself to be able to listen to the output to monitor our distance and volume when speaking with the mic
Hey Marcus.
I assume your guest is in the same room as you? You can use a simple headphone splitter for this.
How come you don’t directly record to your laptop? I don’t see the point of recording into an external recorder? Could you please clarify?
Hi Marcus.
I have multiple reason for doing so. I am not saying that this is the only way to do it but it’s my way.
1. A computer is doing MANY several things at once. It’s running the skype call with my guest, browsers, email, etc. A software that I would use to record a call could crash at any time.
A recorder on the other hand has one single job – to record that audio. There is no chance of it crashing mid-call. (and yes, I have lost a very valuable episode because of a software crash).
2. Sometimes I edit my episode on my PC, sometimes I edit it on one of my laptops. Having an SD card ready makes it easier to plug it into whichever computer I will use to edit it instead of having to copy/paste it.
These are my 2 main reasons for using a recorder.
I have been trying to find something like this for the last week and finally saw your link on Reddit from a couple years ago!
This is priceless info, but I still have a few other questions…
Do I need any sort of sound muting panels or whatever those are called?
Do you have any resources for additional ways to market the podcasts once they are live besides besides dropping 10 and getting downloads/reviews?
Any major changes in the last two years you would probably add to this if you were to redo the post again?
Thanks so much!
Hello Alex,
My laptop does not have a microphone jack, so I cannot connect the 3.5 mm TRS to 1/4 inch TRS Stereo cable anywhere. Do you happen to know any alternatives to get this going?
Thanks
You can purchase an external sound card or use a USB mic.
Thanks excellent
Alex, thank you very much for providing this extremely informative page, you helped begin my podcast. But…one big problem I’m having so far is that there’s a noticeable amount of white noise when I’m recording (i use all the same equipment as you, although I use a Zoom H1 recorder and the HENYX 1202 mixer, which has 4 mic inputs). Do you know how I can adjust the mixer levels or the positioning of the mic in some way to reduce this constant buzz in the background? It’s pretty noticeable when I’m recording, and when I listen to it later and turn up the volume a bit I can definitely hear it, especially with good headphones. Also, another question, when the Zoom H1 is attached i only see the volume levels on it and not on the light pad on the mixer. Is this how it’s supposed to be? I would really appreciate your feedback!
Hi Sean. White noise can be cause by many different items as far as I understand (computer, mixer, mic, cables, etc).
I also get a little bit of white noise when I record so here is how I fight it.
Before I start talking I record 3-5 seconds of silence. This will serve as a reference point for audacity. When I am done recording, I input the file into Audacity. I select the 3-5 seconds of silence, click on Effects – Noise Reduction – Get Noise Profile. Close that window. Now select the whole track, Effects – Noise Reduction – OK.
This gets rid of most of the noise.
Hope this helps.
Hey Alex,
I appreciate the good content and the level of effort you have gone to in putting this together.
Cheers
Hi Alex,
Thanks a lot for your comprehensive guide on how to start a podcast! After following your guide, I successfully launched my podcast called Refuel today on iTunes. I couldn’t thank you more for all the awesome information packed in your post.
Now Refuel’s out in the world, time to work on getting more listeners. Keep up the awesome work!
Hey Kat! I am very proud of you for starting the Refuel podcast! Just listened to your pilot episode and you definitely got a new subscriber (along with a rating and a review. Keep up the great work!
Alex
Hey Alex!
Thanks for the very in-depth tutorial which I read in a single sip. 🙂
I have one question about the podcast feed, though. You mentioned you ditched the PowerPress plugin because your feed was getting heavier and it was a lot of work to post a new episode. But I see other podcasters still recommending it. (Have you tried limitting your number of episodes under “Feed Settings” to make it lighter?)
My question: if you’re using Libsyn’s feed feature, how can you upload a new episode and have it published at a later date? (Say you’re going on a trip and want to upload several episodes to be published at a set day of the week while you’re traveling.) With WordPress and PowerPress you’d just have to schedule your podcast episodes (i.e., posts) to a date in the future, is that possible with Libsyn?
Thanks for your help in advance!
Best,
LL
Hi Louie.
Libsyn has a scheduling feature as well and I’ve used it on numerous occasions. Besides Libsyn automatically converts my audio files to video files and automatically uploads them to YouTube 🙂
I though of limiting my number of episodes in the feed but this means that people will not see your full list of episodes. I still see people listening to mu first episodes from 2 years ago. That wouldn’t be possible if I limited the number in the feed.
Once again, I believe the more elements you have in the set-up the more risk you have of something breaking and then good luck trying to figure out what exactly is broken. Since I switched to Libsyn completely I know if there are ANY issues with the podcast it’s on their side. I must mention that I haven’t had a single issue since switching the feed to Libsyn.
Alex
One of the biggest challenges that new home business owners is lead generation. Some, know about blogging, social media marketing and paid advertising but podcasting is another source of lead generation that people don’t often think about. Your post gives people about the tools that they will need and information about editing that will truly be invaluable to the newbie podcaster. Great information here. Thanks.
Jon, podcasting could definitely serve as a traffic and lead generator. In fact many people have been able to build multi-million dollar business off of their podcasts! Definitely worth looking into 😉
Alex
Hi Alex,
Excellent and very thorough guide about teaching a novice on how to start my own podcasting set up (always wondered how and what kind of effort is required)…
From the microphone to the mixer, and onto the recorder, cables, headphones etc. I can’t decide whether it is more, or less, elaborate than what I had in mind (a recording studio?…)
There are indeed many steps involved with getting a podcast show going. And it may not be for those that are just in it to make money as you had mentioned. Thanks for the sharing regardless!
Thanks for reading Merrell!
It’s not that complicated once you know how to set it up. And that’s exactly why I published this post 😉
– Alex
That is an amazing amount of information, thank you. I’m still stuck trying to upload a video to youtube, lol.
The last number I read in your post was $300. Is this the final all in cost to start a podcast, equipment included?
That seems pretty cheap. That doesn’t include the monthly sub to Libsyn, right?
Your step by step is definitely the best I’ve read on the subject.
Peter, I spent about $300 on the whole set-up excluding headphones (as I imagine most people already have headphones). And yes, you need to add the cost of Libsyn, their smallest plan is $5 per month but I am on a $15/m plan.
Hi Alex,
I’ve been looking into setting up my own podcast, and your article was by far the most informative one I’ve seen on the subject.
Thanks for that! I’ve bookmarked it, and will check it out again as I get started.
One question though. You say that podcasting is great for promoting your own brand, but the impact is hard to measure.
Are there no metrics which relate to subscription, or list building?
Cheers!
Glad to hear you liked it 😉
There are very basic metrics. For example you can’t know how many people are subscribed to your show and through which platform.
I can see how many downloads I have per episode but I can’t know how many of these listeners actually went to my site or purchased anything (or signed up to my list).
Alex
Hey Alex!
wow I’ve always wanted to start a podcast and there’s bits of information from blog that I need to read but yours wrote down literally everything!
I was looking at skype to do the podcast too but after hearing some complaints of how it crash during interviews, it must have been very embarrassing. kind of scary so I think its best for us to get the right equipment. If my equipment were to crash during an interview session, what would be the best way for me to get about and control the situation if you don’t me asking? Just getting myself prepared just in case 😀
Skype actually never crashed.
What crashed was the software that records Skype calls. You shouldn’t worry about the equipment crashing as hardware rarely does (never heard of anyone’s mixer or digital recorder crashing) so that something you shouldn’t even worry about.
Alex